أنظمة خنفر

حل متكامل لتحليلات الفيديو والذكاء الصناعي يعمل في الوقت الحقيقي، مصمم خصيصًا لأنظمة ANPR / LPR (قراءة لوحات المركبات)، مع دعم المناطق (Zones)، التتبع (Tracking)، تقليل الإشعارات المكررة (Anti-Spam)، والتنبيهات المتقدمة.

Khanfar Systems

A complete real-time video analytics & AI platform built for ANPR / LPR (License Plate Recognition), with zones, tracking, anti-spam motion gating, and powerful alerting tools.

RTSPIP Cameras YOLODetection OCREasyOCR Offline WebDashboard
ملاحظة: ملف التحميل سيكون بصيغة .zip وكلمة مرور فك الضغط: 1234 (ستضيف رابط التحميل لاحقًا).
Note: Download package is a .zip. Unzip password: 1234 (you will add the download link later).
Preview Screens • Zones • Alerts
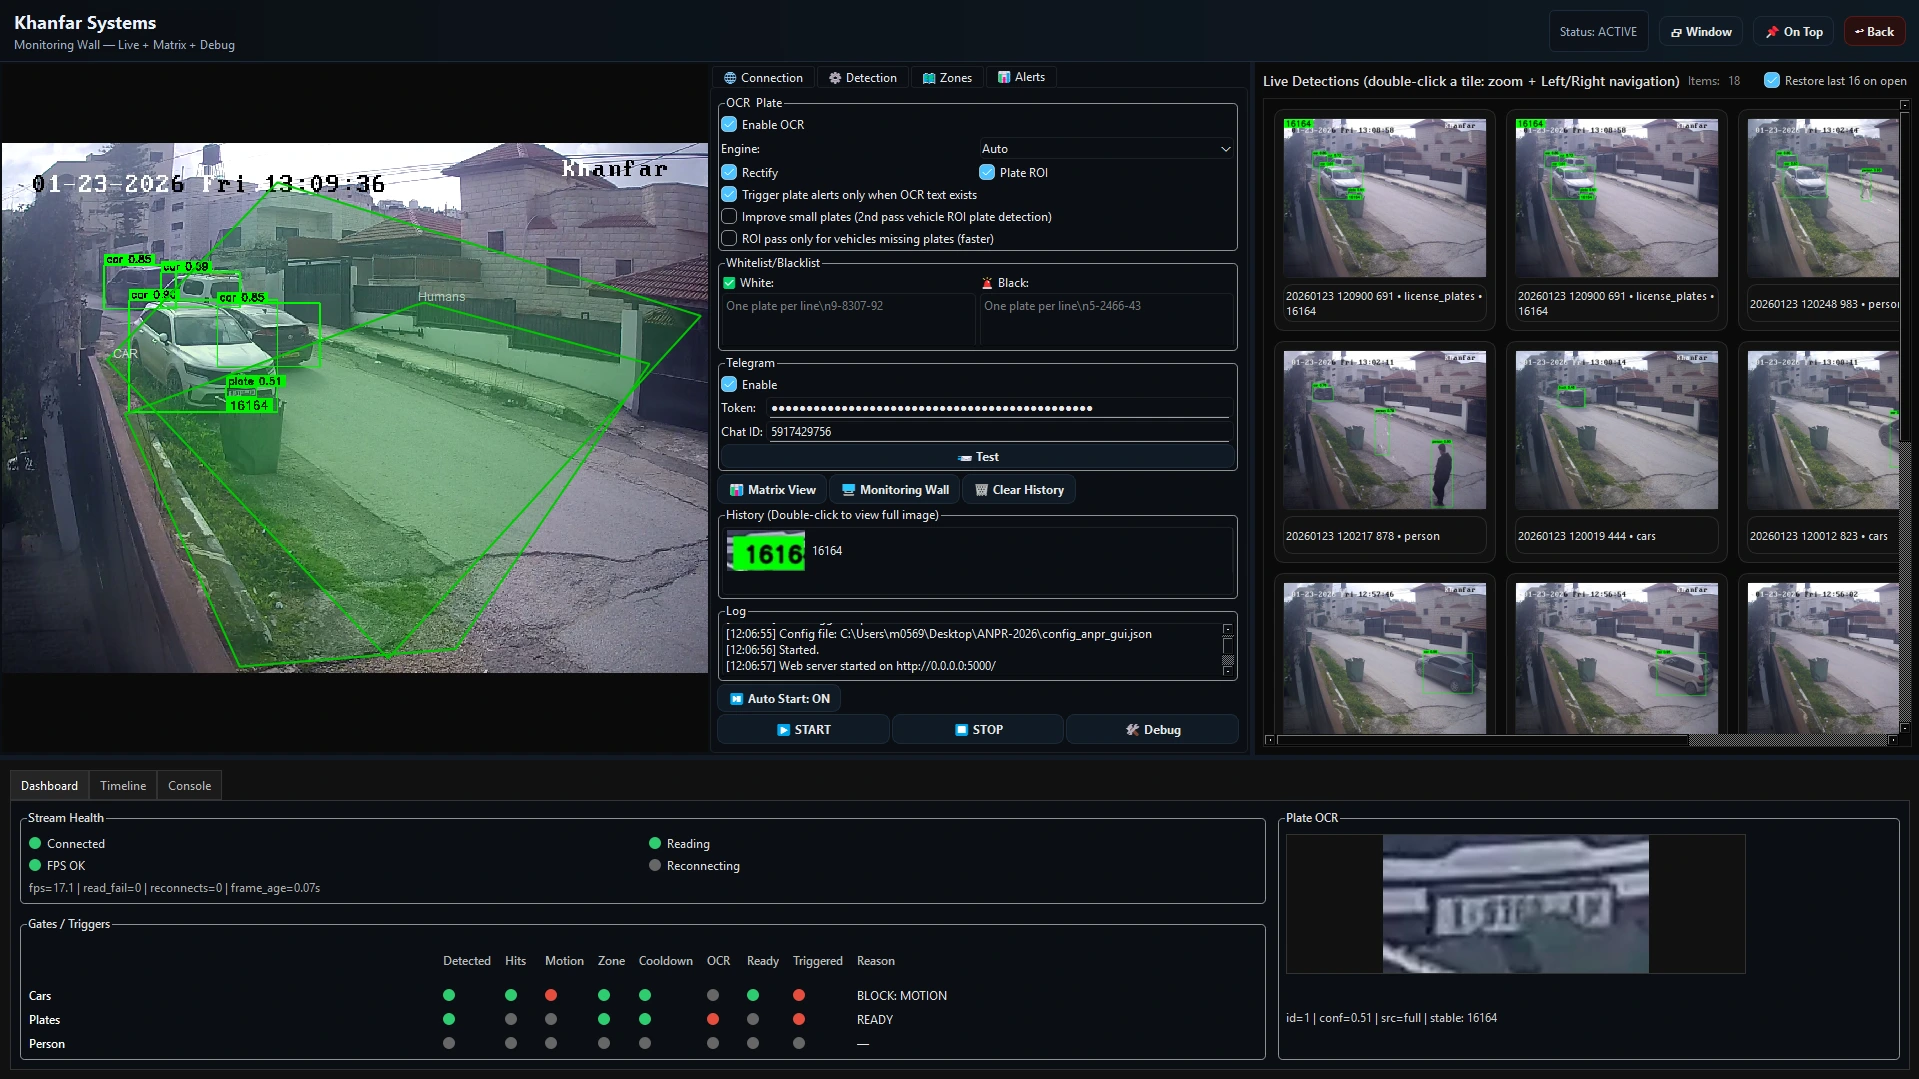
Khanfar Systems preview 1
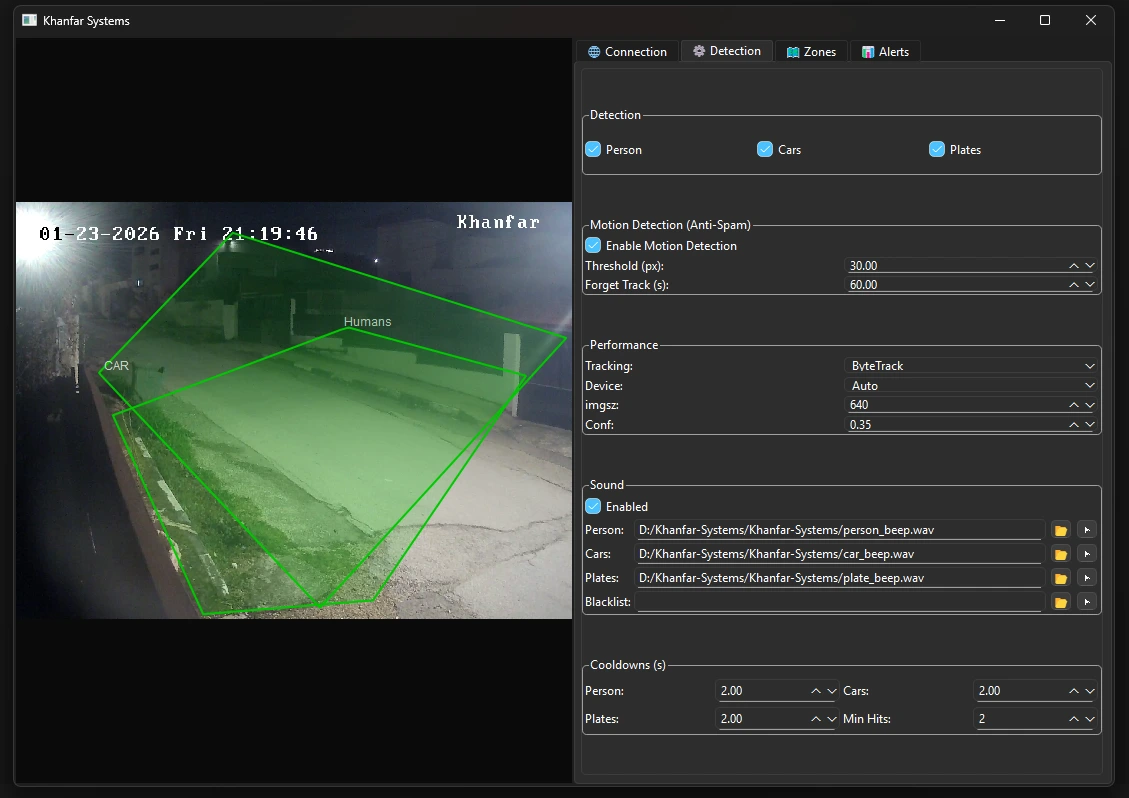
Tracking Off / ByteTrack / BoT-SORT Off / ByteTrack / BoT-SORT
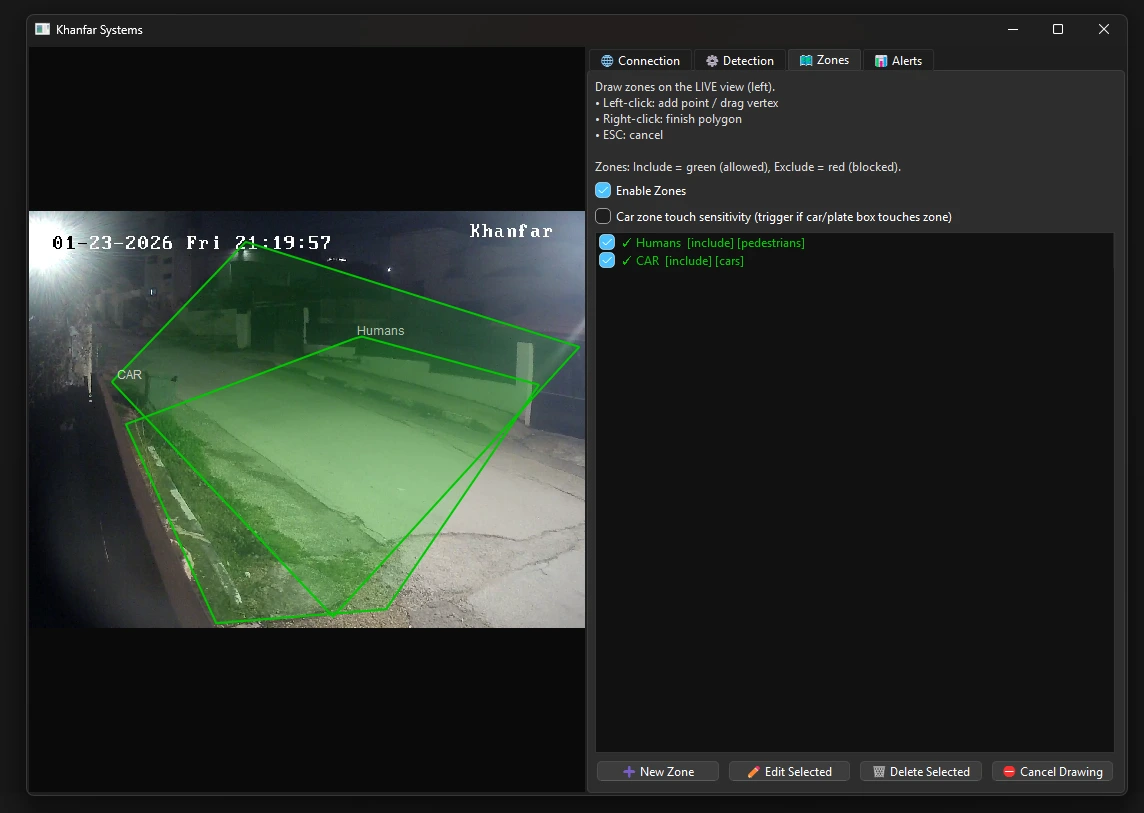
Zones Include / Exclude + Touch Sensitivity Include / Exclude + Touch Sensitivity
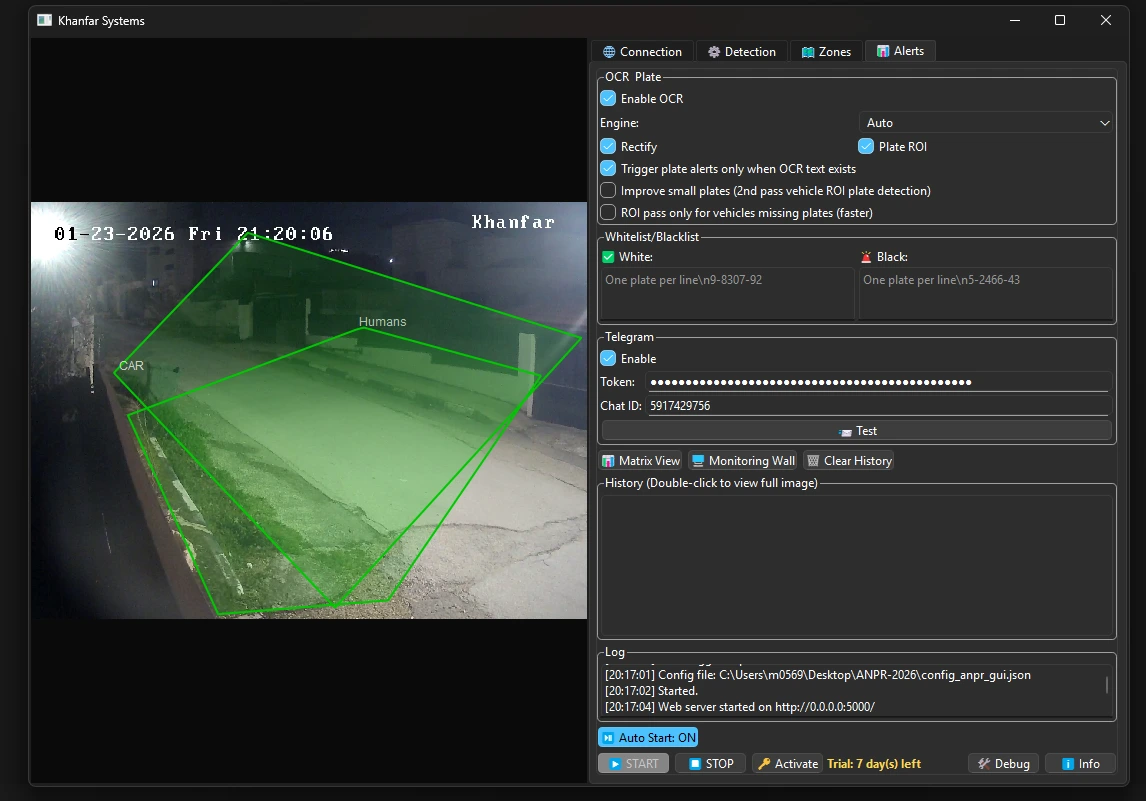
Alerts Sound + Telegram + History Sound + Telegram + History
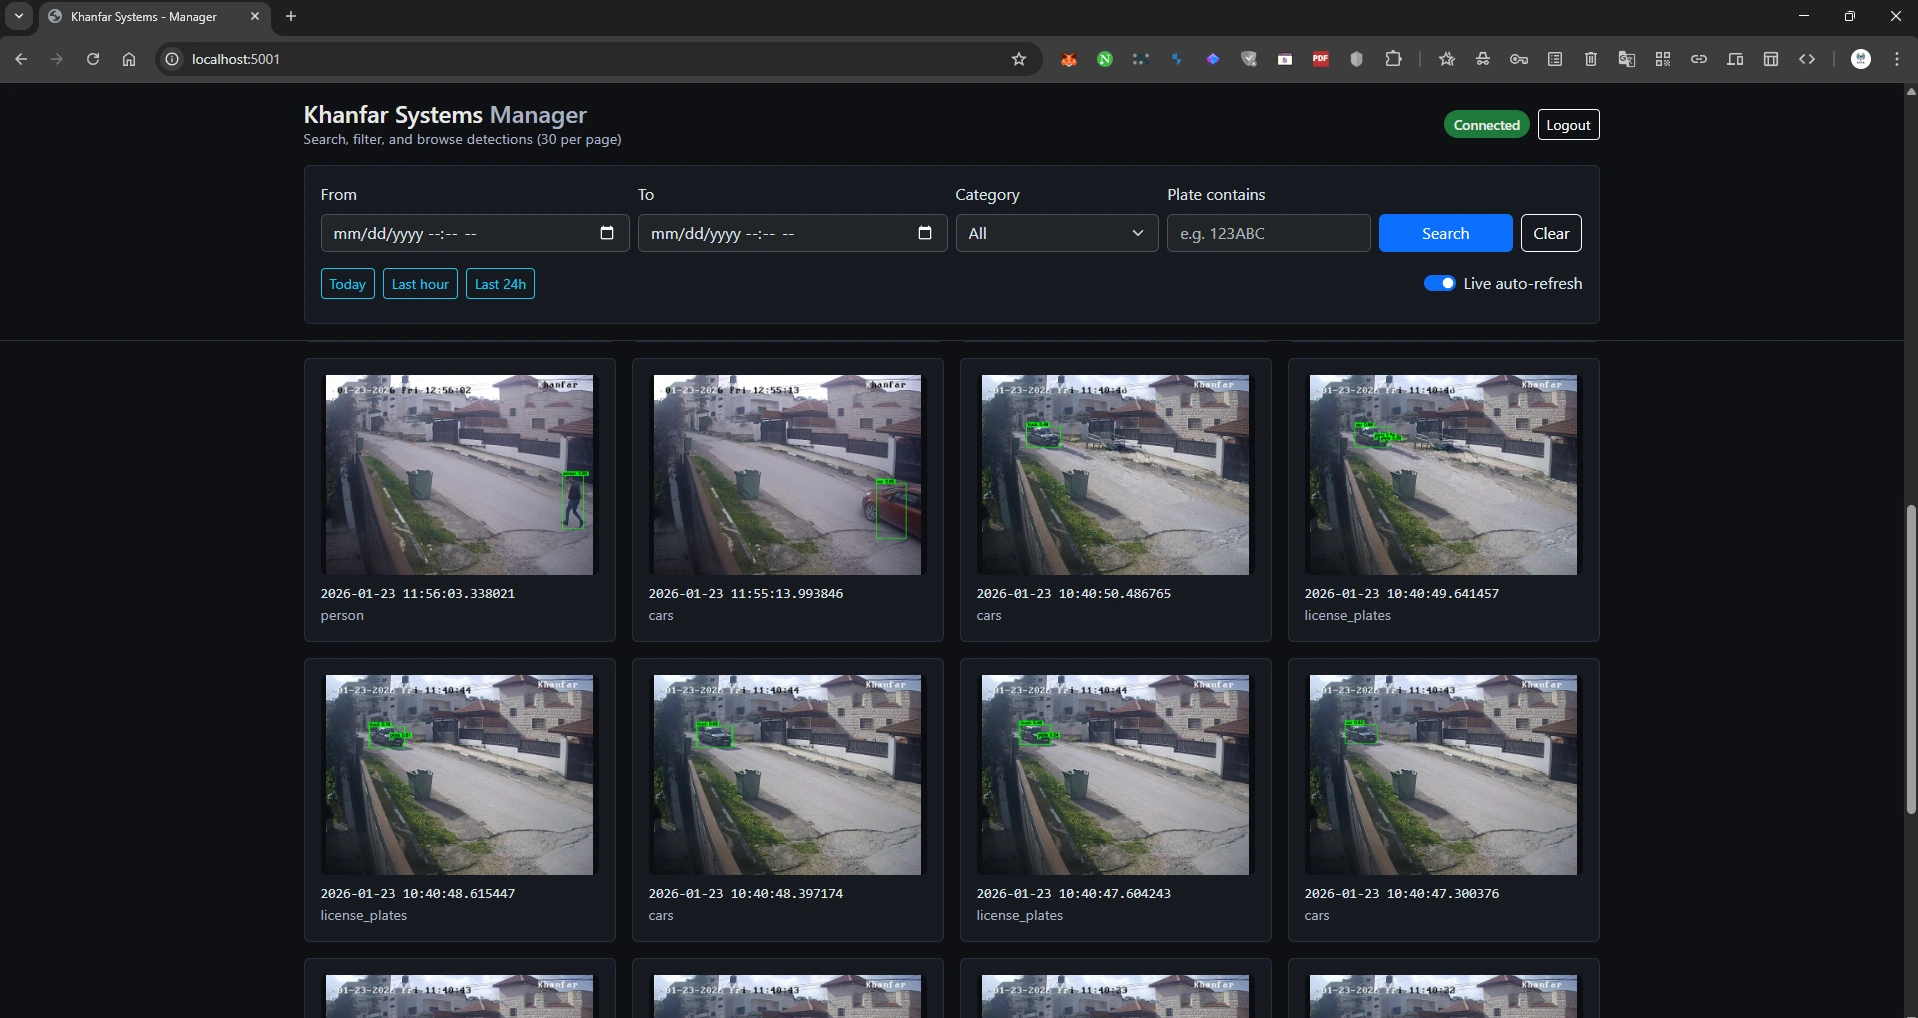
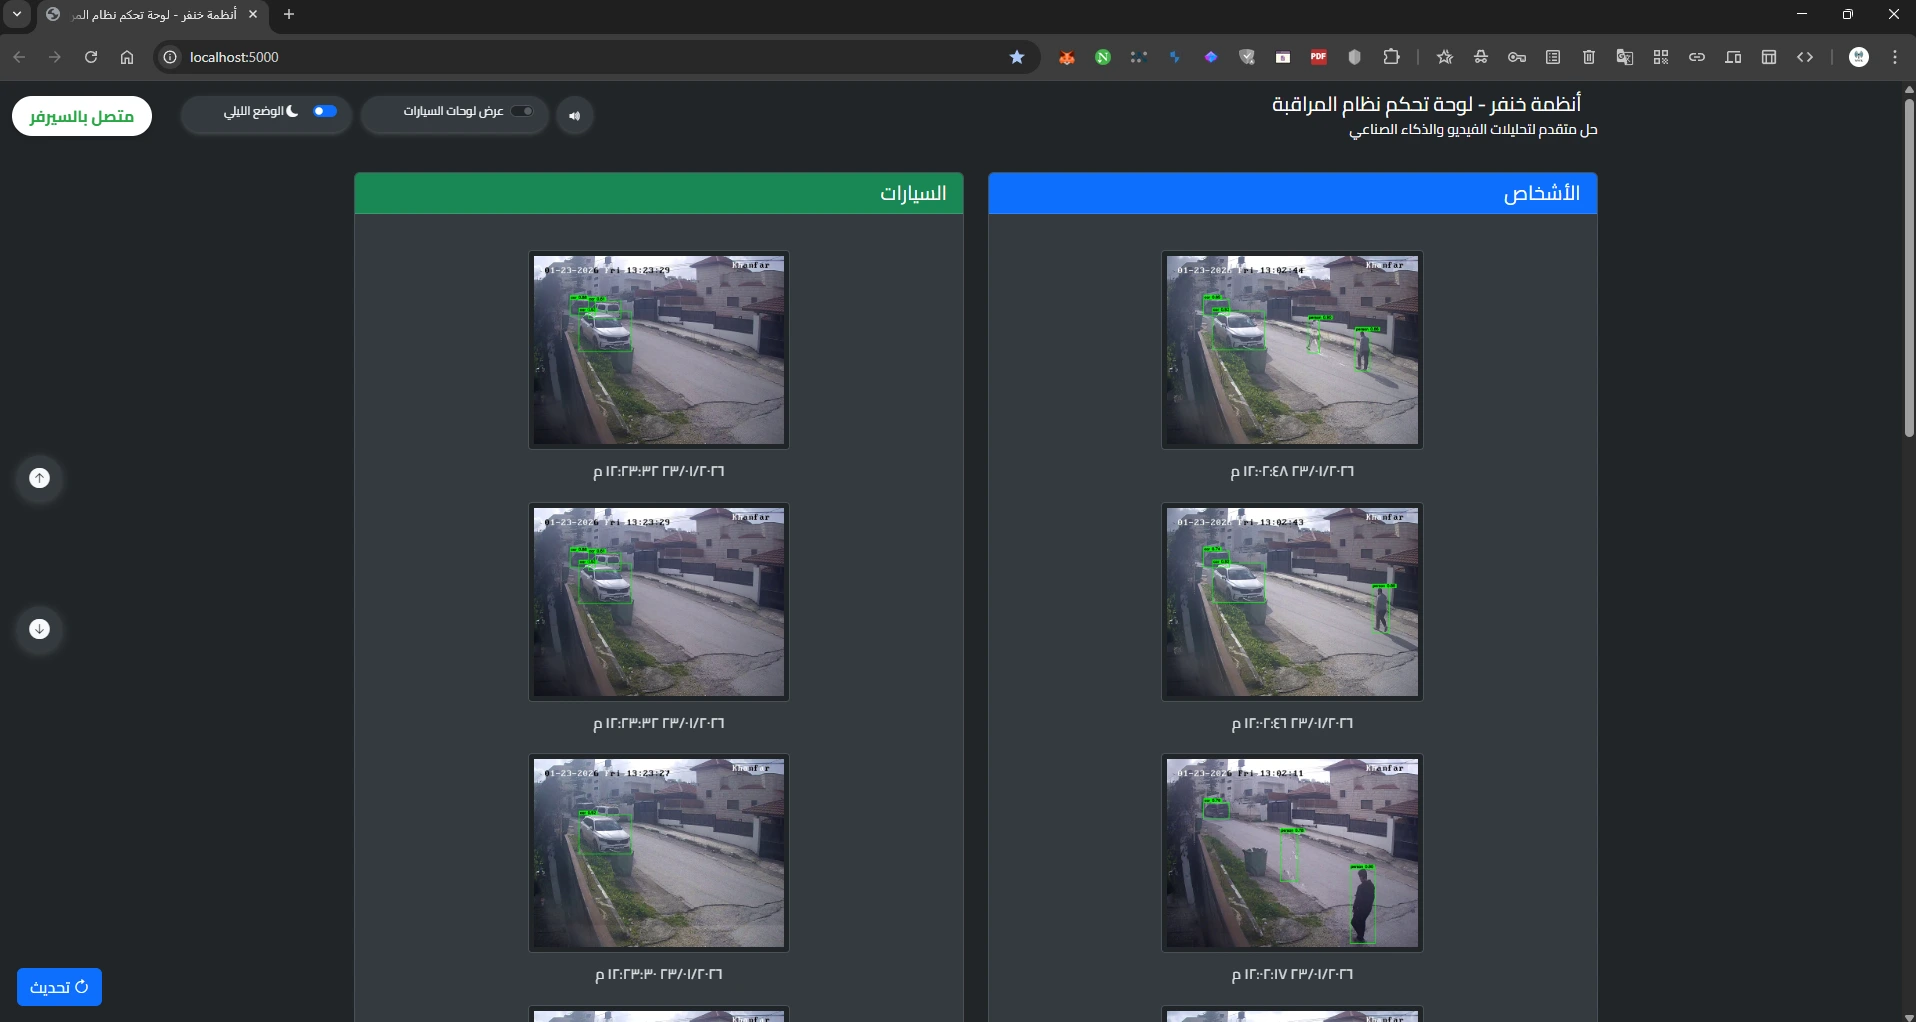
Web Live Dashboard + Manager Portal Live Dashboard + Manager Portal

المزايا الرئيسية

Core Features

كل ما تحتاجه لتشغيل نظام ذكاء صناعي للمراقبة وتحليلات الفيديو بشكل احترافي.

Everything you need for professional real-time AI video analytics and ANPR.

Windows x64 RTSP :554 Ports: 5000 / 5001 Config: config_anpr_gui.json
🎥
RTSP Camera Connection + Builder

ربط سريع مع كاميرات الشبكة عبر RTSP مع منشئ رابط (IP / Port / User / Pass / Path) وبروفايلات جاهزة.

Fast RTSP IP camera connection with URL builder (IP/Port/User/Pass/Path) and ready camera presets.

  • بحث تلقائي داخل الشبكة LAN Camera Discovery على المنفذ 554.
  • Built-in LAN discovery scanning RTSP devices on port 554.
  • أزرار مسار جاهزة: Main (101) و Sub (102) للكاميرات الشائعة.
  • Quick path buttons: Main (101) / Sub (102) for common camera streams.
  • زر اختبار: Test Connection قبل التشغيل.
  • Test Connection button before you START.
🧠
AI Detection (Person / Cars / Plates)

تشغيل/إيقاف كل نوع كشف بسهولة: Person, Cars, Plates.

Enable/disable detections easily: Person, Cars, and Plates.

  • نماذج قابلة للتغيير: YOLO العام + نموذج اللوحات.
  • Replaceable models: general YOLO + dedicated plate detector.
  • إعدادات الدقة والثقة: imgsz و Conf.
  • Tune accuracy and confidence: imgsz and Conf.
🧭
Zones (Include / Exclude)

تحكم كامل بالمناطق: المسموح Include (أخضر) والمحظور Exclude (أحمر). يمكن تخصيص المناطق لـ Cars أو Pedestrians.

Full zone control: Include (green) and Exclude (red). Zones can target Cars or Pedestrians.

  • الرسم على الفيديو المباشر: يسار لإضافة نقاط / يمين لإنهاء المضلع.
  • Draw directly on LIVE view: left click to add points, right click to finish.
  • اللوحات Plates تُدار عبر مناطق السيارات (Cars zones) تلقائيًا.
  • Plates are gated by Cars zones automatically.
🛰️
Tracking: Off / ByteTrack / BoT-SORT

التتبع يمنح كل كائن ID ثابت عبر الإطارات لتقليل التكرار وتحسين منطق الإشعارات.

Tracking gives each object a stable ID across frames to reduce duplicates and improve event logic.

  • ByteTrack: سريع وخفيف ومناسب لمعظم الحالات.
  • ByteTrack: fast and lightweight for most scenes.
  • BoT-SORT: ثبات أعلى في الازدحام والاحتجاب (Occlusion).
  • BoT-SORT: more stable IDs in crowded/occluded scenes.
🛡️
Motion Detection (Anti-Spam)

تقليل الإشعارات المكررة للسيارات باستخدام شرط الحركة (Movement Threshold) + مدة نسيان التتبع.

Reduce repetitive car alerts using motion gating + track forget timer.

  • Threshold (px): الحد الأدنى لحركة الصندوق قبل السماح بالتنبيه.
  • Threshold (px): minimum movement before allowing an alert.
  • Forget Track (s): تنظيف/نسيان التتبع بعد مدة عدم الظهور.
  • Forget Track (s): clears old track IDs after they disappear.
🔤
OCR & Plate Intelligence

قراءة اللوحات مع دعم التشغيل دون إنترنت (Offline) عند استخدام EasyOCR وملفات النماذج. إضافة تحسين اللوحات الصغيرة عبر تمريرة ثانية للـROI.

Read plates with offline-ready EasyOCR model files, plus small-plate enhancement via a second ROI pass.

  • اختيار المحرك: Auto / EasyOCR / PaddleOCR / Tesseract.
  • Choose engine: Auto / EasyOCR / PaddleOCR / Tesseract.
  • خيارات: Rectify + Plate ROI.
  • Options: Rectify + Plate ROI.
  • تحسين اللوحات البعيدة: 2nd pass vehicle ROI plate detection.
  • Improve small/far plates: 2nd-pass plate detection on vehicle ROI.
Whitelist / Blacklist

أنظمة القوائم لتسهيل قرارات التنبيه: لوحات مسموحة (Whitelist) ولوحات محظورة (Blacklist) — لوحة لكل سطر.

Plate lists for instant decisions: Whitelist and Blacklist — one plate per line.

  • عرض علامة الحالة مع نتيجة OCR داخل السجل والتاريخ.
  • Shows flags alongside OCR results in history/log.
  • يمكن تخصيص صوت خاص للـ BLACKLIST.
  • Dedicated sound for BLACKLIST available.
🔔
Alerts: Cooldowns + Sound + Telegram

تنبيهات مرنة مع تحكم بالحد الزمني بين التنبيهات (Cooldown) لكل فئة + صوتيات + إرسال تلقائي عبر تيليجرام.

Flexible alerts with per-category cooldowns, sound notifications, and Telegram delivery.

  • Cooldowns (s): Person / Cars / Plates.
  • Cooldowns (s): Person / Cars / Plates.
  • اختيار ملفات الصوت .wav لكل نوع + زر اختبار ▶.
  • Pick .wav files per category + test ▶ button.
  • Telegram: Bot Token + Chat ID + زر Test.
  • Telegram: Bot Token + Chat ID + Test button.
🌐
Web Server + Manager Portal

واجهتان ويب جاهزتان: لوحة مباشرة للآخر الاكتشافات + بوابة مدير (Manager) للبحث والسجل (مع تسجيل دخول).

Two built-in web interfaces: a live detections dashboard + an authenticated Manager portal for history/search.

  • Enable web dashboard + زر Open Web Page.
  • Enable web dashboard + Open Web Page button.
  • Manager Web: Port + Username/Password + زر Manager.
  • Manager Web: port + username/password + Manager button.
🧪
Debug Cockpit + Matrix View

أدوات مراقبة وتشخيص مباشرة: Debug cockpit لرؤية حالات البوابات (Zones/Motion/Cooldown/Hits/OCR) و Matrix View لعرض الصور في شبكة.

Live diagnostic tools: Debug cockpit showing gate states (Zones/Motion/Cooldown/Hits/OCR) and Matrix View.

  • لتسهيل معرفة سبب عدم إطلاق التنبيه (Blocked reason).
  • Helps you understand why a detection didn’t trigger (blocked reason).
  • مفيد عند ضبط المناطق والإعدادات بدقة.
  • Very useful when tuning zones and thresholds.
📁
History + Log + Saved Detections

حفظ الاكتشافات تلقائيًا داخل مجلد detections مع سجل (Log) وتاريخ مصور (History).

Automatically saves detections into the detections folder, with built-in Log and image History.

  • النقر المزدوج على عنصر التاريخ لعرض الصورة كاملة.
  • Double-click a history item to view full image.
  • اختياري: حفظ الإطار مع الرسومات (Annotated frame).
  • Optional: save annotated frames.
Performance Tuning (CPU / CUDA)

تحكم كامل بالأداء: اختيار الجهاز Auto / CUDA / CPU، حجم الصورة، وتخطي الإطارات.

Full performance control: device Auto/CUDA/CPU, image size, and frame skipping.

  • infer every N frames: لتقليل الحمل وتحسين السلاسة.
  • infer every N frames: reduce compute load.
  • max UI FPS: يجعل واجهة العرض مستقرة.
  • max UI FPS: keeps UI stable.

صور من النظام

Screenshots

ضع الصور التالية داخل مجلد pic بجانب ملف index.html.

Place these images inside ./pic next to index.html.

pic/1.webp pic/2.webp pic/3.webp pic/4.webp pic/5.webp pic/6.webp

التوثيق: التشغيل والمتطلبات وطريقة الاستخدام

Documentation: Setup, Requirements, How to Use

شرح شامل لكل الأزرار والإعدادات داخل البرنامج، مع أفضل الممارسات والتوجيهات.

Complete guide for every tab/button/setting, with best practices and tips.

Getting Started Run • Requirements • GPU
طريقة التشغيل (Windows) How to Run (Windows) Run

خطوات التشغيل

  1. قم بفك ضغط الملف .zip (كلمة المرور: 1234).
  2. لا تنقل فقط ملف .exe وحده — يجب تشغيله من داخل مجلد البرنامج بالكامل.
  3. شغّل Khanfar Systems.exe.
  4. إذا ظهر طلب جدار الحماية (Firewall)، اسمح للبرنامج (مهم لميزة الويب Web Server و Manager).

مجلدات مهمة داخل الحزمة

  • models/: يحتوي نموذج كشف اللوحات license-plate-finetune-v1s.pt.
  • ocr_models/: ملفات EasyOCR (مثل craft_mlt_25k.pth و english_g2.pth).
  • detections/: سيتم حفظ النتائج هنا (صور/قصاصات/مخرجات).

أين يتم حفظ الإعدادات؟

يتم حفظ إعداداتك في ملف config_anpr_gui.json في مسار ثابت لضمان بقائها بعد إعادة التشغيل.

Steps

  1. Unzip the package (password: 1234).
  2. Do not copy only the .exe — run it from the full application folder.
  3. Run Khanfar Systems.exe.
  4. If Windows Firewall asks, allow access (important for Web Server and Manager).

Important folders in the package

  • models/: includes the plate detector license-plate-finetune-v1s.pt.
  • ocr_models/: EasyOCR weights (e.g., craft_mlt_25k.pth, english_g2.pth).
  • detections/: saved outputs (frames/crops/results).

Where settings are stored

Settings persist in config_anpr_gui.json so they survive restarts and updates. The software attempts to store the config next to the EXE first. If that location isn’t writable, it falls back to:

  • %APPDATA%\KhanfarSystemsANPR\config_anpr_gui.json
  • ~/.khanfar_anpr/config_anpr_gui.json (fallback)

Tip: to reset settings, close the app and delete config_anpr_gui.json. On next run, defaults will be created.

Minimum Requirements (Recommended)

  • OS: Windows 10 / 11 (64-bit)
  • CPU: 4 cores minimum (6–8 cores recommended)
  • RAM: 8 GB minimum (16 GB recommended)
  • Disk: 2 GB for the app + storage for detections/
  • Network: Stable LAN access to cameras (RTSP)

GPU (Optional but highly recommended)

  • NVIDIA GPU: Any modern CUDA-capable GPU improves FPS.
  • Driver: Install NVIDIA driver on the target PC.
  • No CUDA Toolkit needed: You do not need to install CUDA Toolkit to run the EXE on GPU.
  • Device setting: Use Device Mode = Auto to pick GPU when available.

Required Runtime (Windows)

  • Microsoft Visual C++ Redistributable 2015–2022 (x64) (recommended for best compatibility).

Where settings are stored

Settings persist in config_anpr_gui.json so they remain consistent between runs. The app tries to store the config next to the EXE first. If that folder isn’t writable, it falls back to:

  • %APPDATA%\KhanfarSystemsANPR\config_anpr_gui.json
  • ~/.khanfar_anpr/config_anpr_gui.json (fallback)

Tip: to reset settings, close the app and delete config_anpr_gui.json. Defaults will be recreated.

المتطلبات الدنيا + تشغيل GPU Minimum Requirements + GPU Requirements

المتطلبات الدنيا (المقترحة)

  • النظام: Windows 10 / 11 (64-bit)
  • المعالج: 4 أنوية كحد أدنى (يفضل 6–8)
  • الذاكرة: 8 GB (يفضل 16 GB)
  • التخزين: 2 GB للبرنامج + مساحة لحفظ detections
  • الشبكة: اتصال LAN مستقر للكاميرات عبر RTSP

تشغيل GPU

  • لا تحتاج تثبيت CUDA Toolkit لتشغيل GPU.
  • المطلوب فقط: تعريف NVIDIA (Driver) على الجهاز الجديد.
  • استخدم Device Mode = Auto وسيختار GPU تلقائياً عند توفره.

مكتبات النظام المطلوبة

  • ننصح بتثبيت Microsoft Visual C++ Redistributable 2015–2022 (x64) لضمان تشغيل البرنامج بدون أخطاء DLL.
  • ننصح باستخدام شاشة بحجم 26 بوصة وأكبر للحصول على أفضل تجربة استخدام.

Minimum requirements

  • OS: Windows 10/11 x64
  • CPU: 4 cores minimum
  • RAM: 8 GB minimum
  • Disk: 2 GB + detections storage
  • Network: reliable RTSP connectivity

GPU notes

  • You do not need CUDA Toolkit to run the EXE on GPU.
  • You do need NVIDIA driver installed on the target PC.
  • Use Device Mode = Auto to automatically select GPU when available.

Windows runtime

  • Install Microsoft Visual C++ Redistributable 2015–2022 (x64) for best compatibility.
  • We recommend using a 26-inch screen size and up for the best user experience.
نقل البرنامج إلى جهاز جديد Moving to a New PC Deploy

معلومات الرخصة

النسخة التجريبية (7 أيام): يمكن نقل البرنامج إلى أي جهاز خلال فترة التجربة.

النسخة المرخصة: الرخصة دائمة ومرتبطة بهاردوير جهازك ولا يمكن نقلها إلى جهاز آخر.

خطوات التثبيت على جهاز جديد

  1. انسخ مجلد البرنامج كامل بعد فك الضغط (ليس ملف .exe وحده).
  2. ثبت تعريف NVIDIA إذا أردت تشغيل GPU.
  3. ثبت VC++ Runtime إذا ظهرت رسائل نقص DLL.
  4. شغّل البرنامج واسمح لجدار الحماية عند طلب ذلك (مهم للويب).

License Information

Trial Version (7 days): You can transfer the software to any PC during the trial period.

Licensed Version: License is permanent and tied to your PC hardware - cannot be transferred to other computers.

Installation Steps

  1. Copy the entire app folder (not only the .exe).
  2. Install NVIDIA driver if you want GPU.
  3. Install VC++ runtime if DLL errors appear.
  4. Run the app and allow Firewall prompts (required for web features).
حلول سريعة للمشاكل Quick Troubleshooting Fix
  • أخطاء RTSP/H264 في الكونسول: غالباً من الشبكة أو ضغط عالي. جرّب تقليل imgsz أو تفعيل infer every N frames أو تقليل جودة بث الكاميرا (Sub stream).
  • لا تظهر صور الويب: تأكد من السماح في Firewall وأن المنفذ 5000 متاح.
  • بطء شديد: فعّل GPU (Auto) أو قلل imgsz أو زد infer every N frames.
  • RTSP/H264 console decode errors: often network / overload. Reduce imgsz, enable infer every N frames, or use camera Sub stream.
  • Web images not loading: allow Windows Firewall and ensure port 5000 is open.
  • Low FPS: enable GPU (Auto), reduce imgsz, or increase infer every N frames.
GUI Walkthrough Tabs • Buttons • Best Settings
الشاشة الرئيسية (LIVE) Main Screen (LIVE) LIVE

كيف تعمل الشاشة الرئيسية؟

  • LIVE View: عرض مباشر للفيديو مع الرسومات (Boxes / Labels / Zones).
  • START / STOP: بدء أو إيقاف المعالجة.
  • Clear: مسح عناصر السجل/التاريخ داخل الواجهة (لا يحذف ملفات الحفظ إلا إذا كان خيار الحذف موجود).
  • Open Folder: فتح مجلد detections.
  • Matrix View: عرض صور الاكتشافات في شبكة.
  • Debug Cockpit: سبب الحظر (Zone / Motion / Cooldown / Hits / OCR).

أفضل إعداد سريع

  1. ابدأ بـ Tracking = ByteTrack.
  2. ضع min_track_hits بين 3 و 5.
  3. اضبط cooldown_cars (مثلاً 2–5 ثواني) لتقليل التكرار.

What you see on LIVE

  • LIVE View: real-time video with overlays (Boxes / Labels / Zones).
  • START / STOP: start/stop processing.
  • Open Folder: opens detections.
  • Matrix View: grid view for saved detections.
  • Debug Cockpit: shows why something is blocked (Zone/Motion/Cooldown/Hits/OCR).

Quick best defaults

  1. Start with Tracking = ByteTrack.
  2. Set min_track_hits around 3–5.
  3. Tune cooldown_cars (e.g., 2–5s) to reduce duplicates.
تبويب الاتصال بالكاميرا Connection Tab RTSP

إنشاء رابط RTSP

  1. أدخل IP و Port (غالباً 554).
  2. أدخل Username و Password إذا كانت الكاميرا محمية.
  3. اختر المسار عبر أزرار Main (101) أو Sub (102) أو اكتب المسار يدوياً.
  4. اضغط Test Connection للتأكد.
  5. بعد النجاح، اضغط START في الشاشة الرئيسية.

البحث داخل الشبكة

زر LAN Camera Discovery يقوم بفحص الشبكة على منفذ 554 لاكتشاف كاميرات محتملة.

Build RTSP URL

  1. Fill IP and Port (usually 554).
  2. Enter Username / Password if needed.
  3. Pick stream path using Main (101) / Sub (102) or enter manually.
  4. Click Test Connection.
  5. When OK, press START.

LAN discovery

LAN Camera Discovery scans your subnet for open RTSP port 554 and highlights likely cameras.

تبويب الكشف والتعرف Detection & OCR Tab AI

Detection toggles

  • Detect Persons: كشف الأشخاص.
  • Detect Cars: كشف المركبات.
  • Detect Plates: كشف اللوحات.

أهم الإعدادات

  • imgsz: زيادة الدقة تعطي OCR أفضل لكن تستهلك GPU/CPU أكثر.
  • Conf: ارفعها لتقليل false positives.
  • infer every N frames: تخفيف الحمل (مثلاً 2 أو 3).
  • min_track_hits: عدد الإطارات المطلوبة قبل إطلاق تنبيه (يقلل التكرار والضجيج).

OCR

  • OCR Engine: Auto / EasyOCR / PaddleOCR / Tesseract.
  • ocr_every_n_frames: OCR كل N إطار لتوفير الأداء.
  • Rectify: تحسين قراءة اللوحات المائلة عبر تصحيح المنظور.
  • Plate ROI 2nd Pass: تمريرة ثانية لتحسين اللوحات الصغيرة/البعيدة.

Detection toggles

  • Detect Persons
  • Detect Cars
  • Detect Plates

Key settings

  • imgsz: higher improves OCR but costs performance.
  • Conf: raise to reduce false positives.
  • infer every N frames: reduce compute load (e.g., 2 or 3).
  • min_track_hits: frames required before triggering (less noise).

OCR

  • OCR Engine: Auto/EasyOCR/PaddleOCR/Tesseract.
  • ocr_every_n_frames: run OCR every N frames for speed.
  • Rectify: perspective correction for tilted plates.
  • Plate ROI 2nd Pass: second pass for small/far plates.
تبويب الأداء (Performance) Performance Tab FPS
  • Device Mode: Auto / CUDA / CPU.
  • imgsz: 640 سريع، 960 أدق، 1280 أعلى دقة لكن أثقل.
  • max UI FPS: لمنع تقطيع الواجهة.
  • infer every N frames: يقلل الحسابات.
  • Device Mode: Auto/CUDA/CPU.
  • imgsz: 640 fast, 960 balanced, 1280 accurate but heavy.
  • max UI FPS: stabilizes the display.
  • infer every N frames: reduces compute.
الكاميرتان (Dual Feed) + طرق العرض (Split / Single / Sweep) Dual Camera (Dual Feed) + Views (Split / Single / Sweep) Dual

الفكرة

  • الكاميرا الرئيسية (Main): كشف Cars / Persons.
  • كاميرا اللوحات (Plate): مخصصة لقراءة اللوحات (عدسة أطول 6mm/8mm/12mm) لتحسين الدقة.
  • التنبيهات تبقى منفصلة: تنبيه سيارة من الرئيسية، وتنبيه لوحة من كاميرا اللوحات.

تفعيل كاميرا اللوحات

  1. من تبويب الكاميرا ضع RTSP لكاميرا اللوحات (مع المستخدم/كلمة المرور إذا لزم).
  2. فعّل خيار Plate Camera Enabled (إذا كان موجوداً في الواجهة).
  3. اضغط START.

طرق العرض

  • Split: عرض الكاميرتين في الواجهة (الرئيسية + اللوحات) في الجانب الأيسر.
  • Main Only / Plate Only: عرض كاميرا واحدة فقط.
  • Sweep: تبديل تلقائي بين العرضين خلال مدة تختارها.

إعداد Sweep (تبديل تلقائي)

  • اختر مدة التبديل: من 4 ثواني إلى 60 ثانية.
  • مثال: 8 ثواني = مريح للمراقبة، و 4 ثواني للتبديل السريع.

Concept

  • Main Camera: detects Cars / Persons.
  • Plate Camera: dedicated for license plates (longer focal 6mm/8mm/12mm for higher plate detail).
  • Alerts stay separate: car/person alerts from Main, plate alerts from Plate cam.

Enable the Plate Camera

  1. In Camera settings, set the Plate camera RTSP (with username/password if needed).
  2. Enable Plate Camera Enabled (if shown in the UI).
  3. Press START.

View Modes

  • Split: show both streams in the left side.
  • Main Only / Plate Only: show a single stream.
  • Sweep: auto-switch between views using a timer.

Sweep interval

  • Choose auto-switch time: 4s to 60s.
  • Examples: 8s comfortable, 4s fast scan.
وضع Clean View (نافذتان عائمتان) + Always On Top Clean View (Floating Windows) + Always On Top Clean

ما هو Clean View؟

  • يفتح نافذتين عائمتين مستقلتين: Main و Plate.
  • يمكنك تحريك كل نافذة ووضعها أينما تريد على الشاشة.
  • يمكنك تكبير/تصغير النافذة، وسيتم تحجيم الفيديو بشكل صحيح داخلها.
  • الـ Zones تظهر أيضاً داخل Clean View.

Always On Top

  • فعّل خيار Keep Clean View Always On Top لتبقى النوافذ فوق أي برنامج.
  • أوقفه إذا أردت أن تختفي خلف البرامج الأخرى.

What is Clean View?

  • Opens two independent floating windows: Main and Plate.
  • You can drag each window anywhere on the screen.
  • You can resize the window and the video scales correctly.
  • Zones are also visible inside Clean View.

Always On Top

  • Enable Keep Clean View Always On Top to keep windows above other apps.
  • Disable if you want normal window stacking.
المناطق Zones لكاميرا اللوحات (Plate Zones) Zones for Plate Camera (Plate Zones) Zones

هدف Plate Zones

  • استخدم Zones لتحديد مكان اللوحات داخل إطار كاميرا اللوحات (مثلاً: مسار دخول/خروج أو منطقة بوابة).
  • يمكنك إنشاء Zones للكاميرا الرئيسية و Zones للكاميرا الثانية بشكل منفصل.

طريقة الرسم

  1. اختر الكاميرا: Plate.
  2. على الفيديو: زر يسار لإضافة نقاط، زر يمين لإنهاء المضلع.
  3. احفظ الإعدادات.

Why Plate Zones?

  • Use zones to restrict plate reading to a specific area (gate lane, entry/exit line, etc.).
  • Main camera zones and Plate camera zones are stored/used separately.

How to draw

  1. Select camera: Plate.
  2. On video: left-click adds points, right-click finishes the polygon.
  3. Save settings.
تقليل الضغط: FPS + معالجة كل N إطار Reduce Load: FPS + Process Every N Frames FPS

لماذا نخفض FPS؟

  • الواي فاي قد يسبب فقدان باكيت / تشويش، فتظهر أخطاء h264 decode.
  • خفض FPS يقلل الضغط على الشبكة وعلى المعالجة.

إعدادات مقترحة (مثال)

  • Main UI FPS: 15–25 (لواجهة سلسة).
  • Plate UI FPS: 10–15 (كافي في أغلب حالات ANPR).
  • Infer every N frames: 2 أو 3 إذا جهازك ضعيف.

أين أغيرها؟

  • من تبويب الأداء Performance ستجد خيارات FPS لكل كاميرا + خيار infer every N frames.
  • إذا أردت جودة أعلى للوحة، ارفع الدقة أو خفض N لكن انتبه للحمل.

Why lower FPS?

  • Wi‑Fi can drop packets → you may see h264 decode warnings.
  • Lower FPS reduces network + CPU/GPU load.

Recommended examples

  • Main UI FPS: 15–25 (smooth UI).
  • Plate UI FPS: 10–15 (often enough for ANPR).
  • Infer every N frames: 2 or 3 for weaker PCs.

Where to change?

  • In Performance tab: FPS controls per camera + infer every N frames.
  • For max plate accuracy: increase resolution or lower N (higher load).
صندوق آخر كشف (Last Box): إخفاء + فلتر (Car/Plate/Dual) Last Box: Hide + Filter (Car/Plate/Dual) Last

ما هو Last Box؟

  • يعرض آخر نتيجة (صورة) بسرعة بدون فتح سجل كبير.
  • الفلتر يؤثر فقط على Last Box، ولا يؤثر على History (التاريخ يبقى يعرض كل الكشوفات).

خيارات

  • Hide Last Box: لإخفاء الصندوق وتكبير مساحة العرض المباشر.
  • Last Box Mode: اختر Last Car أو Last Plate أو Dual.

What is Last Box?

  • Shows the latest detection quickly.
  • Filter affects only Last Box, not the History list (history still includes all detections).

Options

  • Hide Last Box: hide it to get more space for live view.
  • Last Box Mode: choose Last Car, Last Plate, or Dual.
اختبار الاتصال (Test Connection) + فحص الشبكة (Scan LAN) Test Connection + Scan LAN LAN

Test Connection

  1. ضع عناوين RTSP في الواجهة (Main و Plate).
  2. اضغط Test Connection.
  3. ستظهر نافذة تعرض نتيجة الاختبار لكل عنوان (فتح/فشل + زمن تقريبي).

Scan LAN + Use Selected

  1. اضغط Scan LAN لعرض كاميرات/عناوين متاحة.
  2. اختر عنصر من القائمة ثم اضغط Use Selected.
  3. ستظهر نافذة تسألك: هل تريد تطبيقه على Main أم Plate؟
  4. يمكنك اختيار Main stream أو Sub stream، وإضافة username/password إذا احتجت.

Test Connection

  1. Fill RTSP URLs in the GUI (Main + Plate).
  2. Click Test Connection.
  3. A dialog shows per‑URL results (opened/failed + approximate timing).

Scan LAN + Use Selected

  1. Click Scan LAN to list discovered camera endpoints.
  2. Select an item and click Use Selected.
  3. A popup asks where to apply it: Main or Plate.
  4. You can choose Main stream or Sub stream, and enter username/password if needed.
الشبكة: Wi‑Fi vs LAN + نصائح لتقليل تقطيع الفيديو Network: Wi‑Fi vs LAN + Tips to reduce stream glitches Tips
  • LAN أفضل من Wi‑Fi خاصة مع كاميرتين.
  • إذا ظهر تقطيع أو أخطاء h264: استخدم Sub stream للعرض أو خفّض FPS.
  • حاول تثبيت القناة/الراوتر، أو قرب الكاميرات من نقطة الوصول.
  • إذا ممكن: استخدم Router قوي (5GHz) أو وصل سلك للكاميرا أو للكمبيوتر.
  • LAN is better than Wi‑Fi, especially with two cameras.
  • If you see stutter or h264 decode warnings: use sub stream for display or lower FPS.
  • Improve Wi‑Fi (5GHz, closer AP, fixed channel) or use wired Ethernet where possible.
سرعة المرور (Traffic Speed) — توضيح مهم Traffic Speed — Important Note Speed

ميزة حساب السرعة تحتاج معايرة (Calibration) مثل: مسافة حقيقية بين نقطتين في الصورة + إعدادات الكاميرا. إذا لم تكن مفعّلة في نسختك الحالية، يمكن إضافتها كميزة لاحقًا.

  • أفضل دقة تكون عندما تكون الكاميرا ثابتة وبزاوية واضحة للطريق.
  • عادة نحتاج: خط دخول/خروج أو منطقة قياس + تحويل بكسل ↔ متر.

Speed estimation requires calibration (real‑world distance reference + camera geometry). If it is not enabled in your current build, it can be added later.

  • Best accuracy with a fixed camera and clear road angle.
  • Typically needs a measurement zone/line and pixel‑to‑meter mapping.
Zones & Logic Include / Exclude • Touch Sensitivity • Pedestrians
كيف تعمل Zones؟ How Zones Work Zones

Include / Exclude

  • Include (أخضر): يسمح بالتنبيه فقط داخل المنطقة.
  • Exclude (أحمر): يمنع التنبيه داخل المنطقة حتى لو كان الكشف صحيح.

القاعدة الأساسية

في الوضع الافتراضي، يتم اعتبار الهدف داخل المنطقة إذا كان مركز صندوق الكشف (bbox center) داخل المضلع.

Car zone touch sensitivity

عند تفعيل Car zone touch sensitivity يصبح الشرط أكثر حساسية: يكفي أن يلمس صندوق السيارة المنطقة (تقاطع/Overlap) ليُعتبر داخلها.

مناطق المشاة (Pedestrians)

يمكنك إنشاء منطقة مخصصة للمشاة. عند تفعيل Pedestrian Include Zone، سيتم التنبيه عندما يدخل الشخص المنطقة المحددة. إذا خرج الشخص خارجها، لن يتم إطلاق تنبيه جديد إلا إذا عاد للمنطقة (بحسب التتبع و cooldown).

Include / Exclude

  • Include (green): only triggers inside the zone.
  • Exclude (red): blocks triggers inside the zone.

Main rule

By default, an object is considered “inside” if the bounding-box center point is inside the polygon.

Car zone touch sensitivity

When Car zone touch sensitivity is enabled, the rule becomes more permissive: any overlap/touch between the car box and the polygon counts as inside.

Pedestrian zones

Create a dedicated pedestrian include zone to only alert when a person enters the zone. Leaving the zone will stop new alerts unless they re-enter (depending on tracking and cooldown).

طريقة رسم المنطقة How to Draw a Zone Draw
  1. اختر نوع المنطقة: Include أو Exclude.
  2. اختر الهدف: Cars أو Pedestrians.
  3. في شاشة الفيديو: اضغط يسار لإضافة نقاط، واضغط يمين لإنهاء المضلع.
  4. استخدم Clear / Delete لإعادة الرسم إذا احتجت.
  1. Select zone type: Include or Exclude.
  2. Select target: Cars or Pedestrians.
  3. On the video: left-click to add points, right-click to finish polygon.
  4. Use Clear/Delete to redraw.
Tracking & Motion Logic min_hits • cooldown • forget_track • motion_threshold
min_track_hits (Minimum hits) min_track_hits (Minimum hits) Hits

min_track_hits يعني: كم إطار يجب أن يظهر الهدف قبل أن يعتبره النظام “جاهز للتنبيه”. الهدف: تقليل التنبيهات الخاطئة والمرور السريع جداً.

  • قيمة أقل = تنبيه أسرع لكن ضجيج أكثر.
  • قيمة أعلى = تنبيه أبطأ لكن ثبات أعلى.

min_track_hits = how many frames an object must be seen before it can trigger. This reduces false positives and very brief detections.

cooldown (منع التكرار) Cooldown (anti-spam) Cooldown

يوجد cooldown لكل فئة (Person / Cars / Plates). بعد إطلاق تنبيه، يمنع النظام إطلاق تنبيه جديد لنفس الفئة حتى تنتهي المدة.

Cooldown exists per category (Person/Cars/Plates). After a trigger, the system blocks new triggers for that category until cooldown ends.

forget_track_seconds forget_track_seconds Forget

forget_track_seconds يحدد مدة الاحتفاظ بالـ Track IDs بعد اختفاء الهدف. بعد مرور المدة بدون ظهور، يتم حذف التتبع من الذاكرة.

مثال: إذا قيمته 60 ثانية، ومرّت سيارة ثم اختفت، سيتم “نسيان” معرفها بعد 60 ثانية من آخر ظهور. هذا لا يمنع سيارة أخرى جديدة من الكشف — السيارة الجديدة غالباً لها Track ID مختلف.

forget_track_seconds controls how long track IDs remain in memory after an object disappears. Once the time passes, the track is cleared.

Example: set to 60s → after a car disappears, its track is forgotten 60 seconds after last seen. This does not block other new cars (they typically get a different track ID).

Motion Detection + مثال (سيارتان بينهما 20 ثانية) Motion Detection + Example (two cars 20s apart) Motion

عند تفعيل Motion Detection للسيارات، النظام يطلب أن تتحرك السيارة مسافة أكبر من motion_threshold_px قبل إطلاق التنبيه.

مثال: إذا مرّت سيارتان وبينهما 20 ثانية، فغالباً سيتم كشف الثانية بشكل طبيعي، لأن forget_track_seconds لا يمنع كشف سيارات جديدة. العامل الذي قد يمنع التنبيه هو cooldown_cars إذا كان مضبوطاً على مدة كبيرة.

With Motion Detection enabled for cars, the system requires a car to move at least motion_threshold_px before triggering.

Example: two cars 20s apart → the second car will usually trigger normally. forget_track_seconds does not block new cars; it only clears old IDs. The only gate that could block is a large cooldown_cars.

Models & Offline OCR .pt • EasyOCR weights • When each is used
لماذا يوجد 3 ملفات نماذج؟ Why 3 model files? Models
  • models/license-plate-finetune-v1s.pt: نموذج YOLO مخصص لاكتشاف اللوحات.
  • ocr_models/easyocr/craft_mlt_25k.pth: نموذج CRAFT لاكتشاف مناطق النص (Text detection) داخل قصاصة اللوحة.
  • ocr_models/easyocr/english_g2.pth: نموذج التعرف على الحروف (Text recognition) لقراءة النص بعد تحديده.

يستخدم البرنامج ملف .pt لاكتشاف اللوحة أولاً، ثم يستخدم ملفات EasyOCR لقراءة النص — وهذا يتيح تشغيل OCR بدون إنترنت.

  • models/license-plate-finetune-v1s.pt: YOLO plate detector.
  • ocr_models/easyocr/craft_mlt_25k.pth: CRAFT text detector for finding text regions.
  • ocr_models/easyocr/english_g2.pth: recognition network to read characters.

The app detects plates with the .pt model first, then reads the text using EasyOCR weights (offline).

متى يتم استخدام BoT-SORT أو ByteTrack أو Off؟ When to use BoT-SORT, ByteTrack, or Off? Tracking
  • Off: بدون تتبع — جيد للاختبار، لكنه قد يكرر التنبيه بكثرة.
  • ByteTrack: سريع وخفيف، ممتاز لمعظم الشوارع.
  • BoT-SORT: أكثر ثباتاً عند الازدحام/الاحتجاب (Occlusion) لكنه أثقل قليلاً.
  • Off: no tracking; ok for testing but may create duplicates.
  • ByteTrack: fast, lightweight, great for most streets.
  • BoT-SORT: more stable under occlusion/crowds, slightly heavier.
Web Dashboard & Manager Live • History • Login
Web Dashboard (بدون تسجيل دخول) Web Dashboard (no login) :5000
  1. فعّل Enable web dashboard.
  2. اختر المنفذ (افتراضي 5000).
  3. اضغط Open Web Page.
  4. سترى آخر الاكتشافات مصنفة: persons / cars / plates.
  1. Enable Enable web dashboard.
  2. Port default is 5000.
  3. Click Open Web Page.
  4. You will see the latest detections categorized: persons/cars/plates.
Manager Portal (تسجيل دخول) Manager Portal (login) :5001

بوابة المدير تعمل على منفذ مستقل (افتراضي 5001) مع صفحة تسجيل دخول.

  1. فعّل Manager Web.
  2. حدد Username و Password.
  3. اضغط زر Manager لفتح البوابة.
  4. يمكنك البحث وعرض السجل والصور داخل الويب.

The Manager portal runs on a separate port (default 5001) with an authenticated login page.

  1. Enable Manager Web.
  2. Set Username and Password.
  3. Press Manager to open the portal.
  4. Use it to view history/search/images.
Telegram Bot (Alerts + Remote Status) Setup • Requirements • How to Use
الإعداد (Setup) Setup Telegram

إنشاء بوت تيليجرام

  1. افتح تيليجرام وابحث عن @BotFather.
  2. اكتب /newbot واتبع الخطوات.
  3. سيعطيك Bot Token — انسخه.

ربط البوت داخل البرنامج

  1. من داخل البرنامج: افتح إعدادات التنبيهات Alerts ثم قسم Telegram.
  2. ضع Bot Token في خانة Telegram Bot Token.
  3. ضع Chat ID في خانة Telegram Chat ID (شرح الحصول عليه بالأسفل).
  4. فعّل Telegram Enabled (إن وجدت) ثم اضغط Test.

إضافة البوت إلى مجموعة خاصة (Private Group)

  1. أنشئ مجموعة تيليجرام خاصة أو استخدم مجموعة موجودة.
  2. أضف البوت إلى المجموعة.
  3. يفضّل جعل البوت Admin حتى يستطيع إرسال رسائل دائماً.
  4. داخل المجموعة ارسل: /chatid للحصول على رقم Chat ID.
  5. انسخ الرقم (غالباً يبدأ بـ -100) وضعه في البرنامج.

ملاحظة: إذا كان البوت لا يرد داخل المجموعة، تأكد من إرسال الأوامر بصيغة تبدأ بـ / مثل /status.

Create a Telegram Bot

  1. Open Telegram and search for @BotFather.
  2. Send /newbot and follow the steps.
  3. Copy the Bot Token you receive.

Connect the bot inside the software

  1. In the app, open AlertsTelegram.
  2. Paste the Bot Token into Telegram Bot Token.
  3. Paste the Chat ID into Telegram Chat ID (how to get it below).
  4. Enable Telegram (if there is a toggle), then press Test.

Add the bot to a Private Group

  1. Create a private Telegram group (or use an existing one).
  2. Add the bot to the group.
  3. Recommended: make the bot an Admin so it can always send messages.
  4. In the group, send /chatid to get the group Chat ID.
  5. Copy the number (often starts with -100) and paste it into the app.

Tip: If the bot doesn’t respond in groups, use slash commands like /status.

المتطلبات (Requirements) Requirements Needed
  • اتصال إنترنت على جهاز الكمبيوتر (لإرسال الرسائل عبر تيليجرام).
  • Bot Token صحيح من @BotFather.
  • Chat ID صحيح (لشات خاص أو لمجموعة).
  • إذا كنت تستخدم مجموعة خاصة: تأكد أن البوت موجود داخل المجموعة، ويفضل كـ Admin.
  • Internet connection on the PC (to send Telegram messages).
  • Valid Bot Token from @BotFather.
  • Correct Chat ID (private chat or group).
  • For private groups: the bot must be added to the group (admin is recommended).
طريقة الاستخدام (How to Use) How to Use Use

رسالة بدء التشغيل

عند تشغيل البرنامج، وإذا كانت ميزة تيليجرام مفعّلة، سيرسل البوت رسالة: Khanfar Systems Bot Start — لتعرف أن البرنامج يعمل على الكمبيوتر.

زر Test

  • إذا كان هناك صورة جاهزة للإرسال: سيتم إرسال صورة اختبار.
  • إذا لم توجد صورة: سيرسل رسالة نصية تؤكد أن البوت يعمل.

قائمة الأوامر من الهاتف (Menu)

يمكنك التحكم من هاتفك حتى وأنت خارج المنزل:

  • /start — يبدأ المحادثة ويظهر زر القائمة.
  • /status أو زر /status ✅ — يرد: Khanfar Systems is ONLINE ✅
  • /chatid — يرسل رقم الشات الحالي (مفيد للمجموعات).

Startup Message

When the software starts, if Telegram is enabled, the bot sends: Khanfar Systems Bot Start — so you know the PC side is running.

Test Button

  • If an image is available: it sends a test image.
  • If no image is available: it sends a text test confirming the bot is running.

Phone Commands (Menu)

Check your system remotely anytime:

  • /start — shows the menu button.
  • /status (or /status ✅ button) — replies: Khanfar Systems is ONLINE ✅
  • /chatid — returns the current chat id (useful for groups).
حل المشاكل (Troubleshooting) Troubleshooting Fix
  • البوت لا يرسل: تأكد من صحة Bot Token و Chat ID.
  • في المجموعة لا يرد: أرسل أوامر تبدأ بـ / مثل /status، وتأكد أن البوت مضاف للمجموعة.
  • لا توجد رسائل Start: تأكد أن خيار تيليجرام مفعّل داخل البرنامج وأن الكمبيوتر متصل بالإنترنت.
  • Bot not sending: verify Bot Token and Chat ID.
  • No response in group: use slash commands like /status and ensure the bot is added to the group.
  • No startup message: make sure Telegram is enabled in the app and the PC has internet.

التحميل والتواصل

Download & Contact

Khanfar Systems (Windows x64)

نسخة جاهزة للتشغيل. ملف التحميل يكون .zip وكلمة المرور: 1234.

Ready-to-run build. Download is a .zip and the unzip password is 1234.

عرض خاص

SPECIAL OFFER

7 أيام تجربة مجانية

7 Days Free Trial

70$

$70

لشراء النسخه الكامله بعد تحربتها فقط 70$

Purchase the full version after trial for only $70

الرخصة تعمل على جهاز واحد فقط ولا يمكن نقلها

License works on one PC only and cannot be transferred

مهم: انسخ/انقل المجلد كامل بعد فك الضغط، وليس ملف .exe وحده.
Important: Copy the entire folder after unzip, not only the .exe.

المطور

Developer

Mkhanfar
E4MWAK@GMAIL.COM

للتواصل والدعم وطلبات تطوير ميزات جديدة، تواصل عبر البريد أعلاه.

For support, customization, and feature requests, contact the email above.